Hacking the Compaq Evo T30 thin-client
(Last modified
2 Mar 2010)
The Compaq Evo T30 (T30) is a thin-client device that has been
appearing a lot on Ebay and in the surplus houses. The device has
no hard drive; instead, it loads its operating system (usually Windows
of some kind) over a network connection to a server elsewhere in the
building. Though it has no hard drive, the T30 does include:
- a 300 MHz Geode CPU,
- small PCB with 128 MB flash drive,
- VGA,
- Ethernet,
- audio,
- serial port,
- P/S2 keyboard connector,
- parallel port,
- PCMCIA socket,
- four USB ports.
I picked one up for about $15 at RE-PC (a must-visit place anytime
you're in Seattle!). This page
describes how I hacked my T30 so I could install an alternate O/S,
namely FreeDOS.

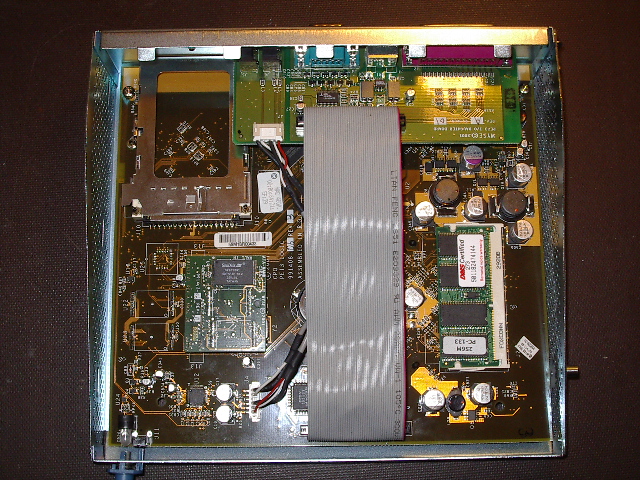
Here is a look at the T30's main board. The flash drive PCB is
the small rectangular board just to the left of the flat, grey ribbon
cable. You can see a PCMCIA slot in the top left, and lower right
is the PC-133 SODIMM memory module.

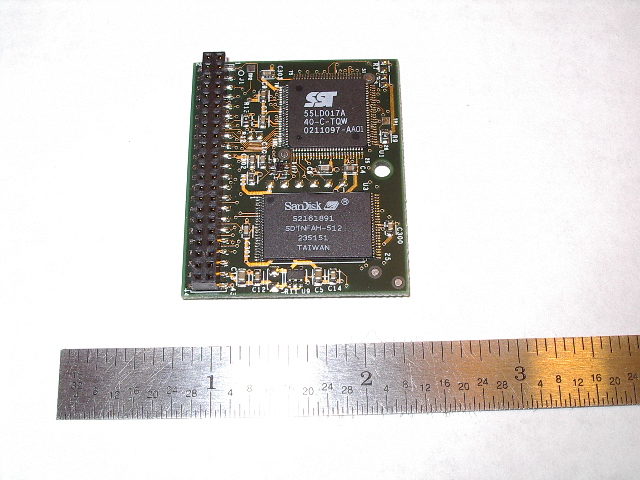
Here is a closer look at the flash drive PCB, showing one of the
SanDisk flash chips and the 44-pin female notebook drive connector.
The flash drive
The flash drive PCB has two SanDisk flash chips on it. This PCB
appears to the T30 as a 128 MB IDE notebook drive. This drive has
been formatted to have two partitions on it. Partition 1 is only
1 MB in size and contains a custom disk image used by the T30 during
boot. Among other things, the code in this partition verifies
that the contents of partition 2 are legal; if partition 2 fails this
test, the device will not boot.
It is this check that prevents someone from taking the obvious step of
replacing the board with a much larger flash drive or notebook
drive. Essentially, anything you install in the flash drive PCB
is limited to the size of the second partition. Additionally, you
CANNOT erase or modify the first partition; if you do, you risk
bricking your T30!
So the true exercise becomes moving a new OS image into the second
partition of the flash drive PCB. One way to do this is to
install the flash drive PCB into a desktop PC and use a live CD to
install an OS. This runs into the obstacle of the flash drive's
connector, which is a 2mm female. This is the opposite gender of
a notebook drive and a serious complication.
Brian solved this problem by building a complete adapter ribbon cable,
to go from the 2mm female connector on the flash drive PCB to a 0.1"
female connector for plugging into a PC motherboard. Check out Brian's
page for more info on his hack; he did a great job!
Since I was too lazy to build such a cable, I opted for a different
technique.
A cheap adapter cable
I started with a short 2mm notebook drive cable (female on each end),
available mail-order or you can harvest one from some of the older Dell
laptops. I took two 2mm pin headers, snapped them off to 44 pins
each, then inserted one into each end of the notebook drive cable,
giving me a ribbon cable with two male ends. I plugged one end
into the flash drive PCB connector. I plugged the other end into
a standard 2.5"-to-3.5" hard drive adapter, commonly available for
about $10 mail-order or at a large computer store.

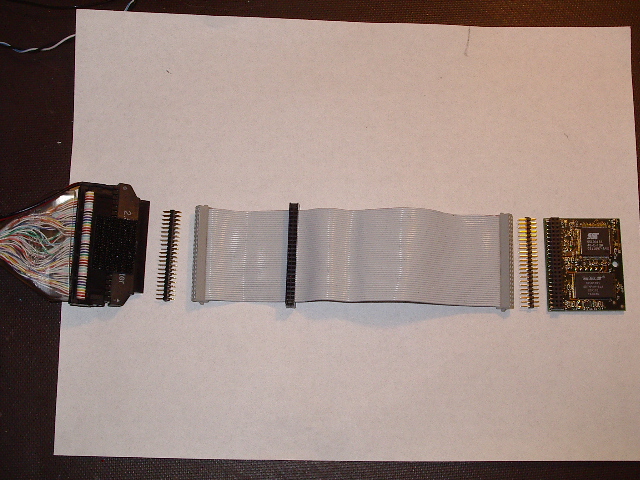
Here you see the pieces of the drive adapter cable laid out in
order. Note that you may have to remove one of the pins on the
male header that plugs into the 2.5"-to-3.5" adapter, as those
connectors usually have a blank spot where one of the pins would
normally go.
With the pieces of this cable assembled together and with the flash
drive PCB plugged in, I was ready to install a new OS on the T30.
Installing the OS
I started by opening up my desktop PC and removing the hard drive; part
of the operation involves formatting the flash drive PCB and I didn't
want anything to happen to my main drive. I installed the IDE
cable from the 2.5"-to-3.5" adapter in the motherboard's IDE connector,
hooked a disk-drive power connector to the 2.5"-to-3.5" adapter's power
connector, and I was ready to boot up the PC.
At this point, you will need a live CD of the OS you intend to
install. I had already downloaded a copy of the FreeDOS ISO image
from the FreeDOS site and
created a CD from it. I booted the CD and selected the live CD
option from the FreeDOS menu. At the command prompt, I typed:
fdisk
This let me view the partitions on the flash drive, which appears to
FreeDOS as C:. FreeDOS reported the first partition as only 1 MB
with no drive letter and formatted for C/PM (?). The second
partition was drive C: and had 127 MB but of an unknown format. I
deleted the second partition (DO NOT DELETE PARTITION 1!!), then
created it as a 127 MB FAT16 partition. I then exited fdisk.
Now I needed to format partition 2 for MS-DOS. At the command
prompt, I typed:
format /s /u
c:
This forces a low-level format of the 127 MB flash drive partition;
after formatting, FreeDOS writes the system files to make the drive
bootable. At this point, I could install just about any OS I
wanted on the C: drive.
Summary
I'm not going to go into the details of loading up FreeDOS; that's for
another page. But if you have one of these boxes available, you
can use the above technique to prepare the flash drive PCB for just
about any OS. Note that the T30 is very popular on the web and a
lot of people have put various OSes on it, typically small Linux
distros such as Damn Small Linux.
If you end up bricking your T30, you can recover by restoring the first
partition. To do that, you will need a copy of the first
partition. I've made that image available here. Note that you will need to use a
low-level write program, such as Linux' dd or DOS' rawrite, to copy the
image into the flash drive PCB hooked to the IDE connector of a desktop
PC.
Home
.