AVR
Development using Visual Studio 2005 as an IDE
(Last updated 24 Sep 2012)
I've used AVR Studio4 for years as my IDE when building Atmel
projects. I use AVR Studio4 because it gets the job done, but its
IDE is painful to use when compared to a tool like Visual Studio, even
the older versions, such as VS 2005. I have a page elsewhere on
this site showing how to use VS 2005 as an IDE for the ARM GCC toolset;
see here. In this page, I'll show
you how I set up VS 2005 for building AVR projects. Note that
this same technique should work, in general, with VS 2008, though I
haven't tested this idea in VS 2008 yet..
Before beginning, please take the time to read through the above link
on bare-metal mbed development using VS 2005. Much of the
information in that link applies to AVR development with VS 2005 and
won't be repeated here.
The biggest hurdle in switching to VS 2005 for AVR development is
having to create your own makefiles. AVR Studio4 creates
makefiles for you in the background and you don't need to know how
makefiles work to use AVR Studio4. But once you leave AVR
Studio4, you are on the hook for creating your own makefiles.
There is a lot of info on the web for using makefiles and you can
always start with a makefile created by AVR Studio4. But sooner
or later, you will need to come up to speed on makefiles.
For my example, I will create a project called firelampvs. This
is the Visual Studio version of my Fire Lamp AVR project, documented
elsewhere on this site.
Begin by launching VS 2005, then creating a new Project
(File/New/Project...). Select Visual C++, then General, then
Makefile project. Fill in the fields at the bottom of the dialog
box for the project name and path to the project folder. I
generally do not create a Solutions folder for small projects; those
are usually reserved for large projects involving multiple source files
or multiple libraries.
You will next see the Makefile Application Wizard. Click Next
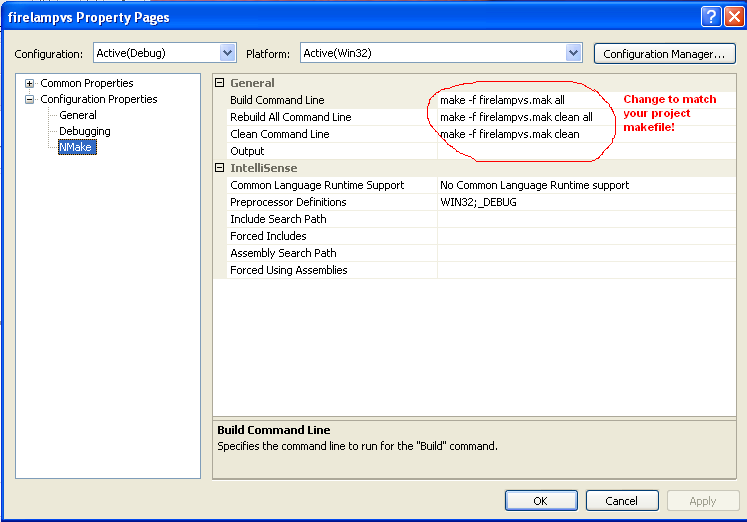
>, then enter the make commands to build, rebuild, and clean the
debug version of your project. These will all be the same
make invocation with different arguments. Below you see a
snapshot of my make commands as they appear in the firelampvs Property
Page; these are the commands I entered in the Application Wizard window
when setting up the project. When setting up your project, you
will use similar make commands, substituting the name of your makefile
for my firelampvs.mak you see here. Be sure to erase the entry in
the Output (for debugging) field; there will not be anything you can
debug with VS 2005.
After entering the information for the debug version of your project,
click Next. This will bring up the page for information on
building the release version of your project. Simply take the
defaults, which uses the same build commands as the debug
version. Click Finish.
With your project defined, you can now begin entering the source
code. If your project already exists, copy the source files and
header files into the project folder you defined in the steps
above. If your project does not yet exist, create new files in
your project folder, then edit in the source code and header
information you will need.
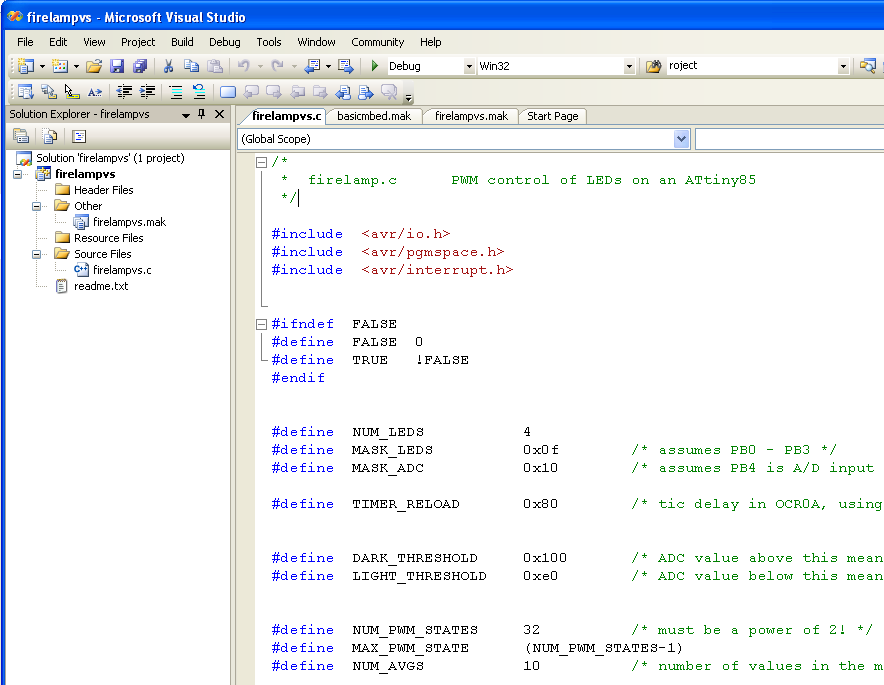
Here you see a snapshot of my firelampvs project, showing the layout of
my project folders.
At this point, you can begin using the power of the VS 2005 IDE.
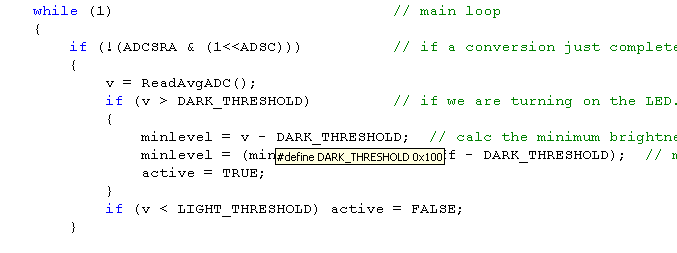
Here is a shot showing how Intellisense helps track macros and #defines
in your code. Just hover the cursor over a macro name or defined
literal and a tooltip shows you information about the object.
I've placed the cursor on the label DARK_THRESHOLD and VS 2005 shows me
the value was previously defined as 0x100.
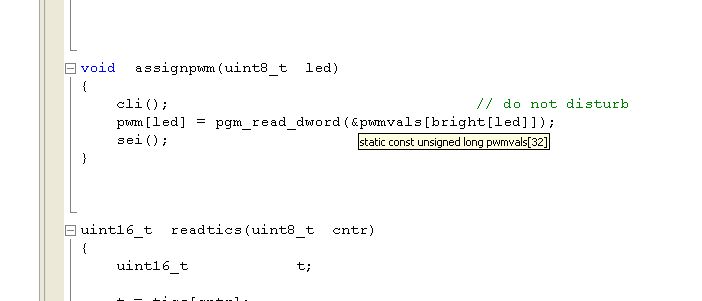
Here, I've hovered the cursor over the array pwmvals[] to see how that
array was declared.
In both of the above examples, you can right-click the object's name,
then select Go To Definition from the drop-down menu, and VS 2005 will
open the file that defines the item and highlight the text line
containing the definition.
But the greatest power in the VS 2005 IDE (to me, at least) is
double-clicking on an error message and having the IDE jump directly to
the offending source line. Making this work requires a minor but
obscure tweak to your makefile.
Here is the entire makefule for my firelampvs project. It should
serve as an example for building your own makefiles.
###############################################################################
# Makefile
for the project firelampvs
###############################################################################
## General
Flags
PROJECT =
firelampvs
MCU = attiny45
TARGET =
$(PROJECT).elf
CC = avr-gcc
CPP = avr-g++
## Options
common to compile, link and assembly rules
COMMON =
-mmcu=$(MCU)
## Compile
options common for all C compilation units.
CFLAGS =
$(COMMON)
CFLAGS +=
-Wall -gdwarf-2 -std=gnu99
-DF_CPU=8000000UL -O0 -funsigned-char -funsigned-bitfields
-fpack-struct -fshort-enums
CFLAGS += -MD
-MP -MT $(*F).o -MF dep/$(@F).d
## Assembly
specific flags
ASMFLAGS =
$(COMMON)
ASMFLAGS +=
$(CFLAGS)
ASMFLAGS +=
-x assembler-with-cpp -Wa,-gdwarf2
## Linker
flags
LDFLAGS =
$(COMMON)
LDFLAGS
+= -Wl,-Map=$(PROJECT).map
## Intel Hex
file production flags
HEX_FLASH_FLAGS
= -R .eeprom -R .fuse -R .lock -R .signature
HEX_EEPROM_FLAGS
= -j .eeprom
HEX_EEPROM_FLAGS
+= --set-section-flags=.eeprom="alloc,load"
HEX_EEPROM_FLAGS
+= --change-section-lma .eeprom=0 --no-change-warnings
## Objects
that must be built in order to link
OBJECTS =
$(PROJECT).o
## Objects
explicitly added by the user
LINKONLYOBJECTS
=
## Build
all:
$(TARGET) $(PROJECT).hex $(PROJECT).eep $(PROJECT).lss size
## Compile
#
# The
compile command has two versions. The short version (without the
sed
#
expression) works with the stock AVRStudio4 project. The long
version
# can
be used with a Visual Studio makefile project; the sed expression
# will
expand the source file pathnames so you can double-click on them in
# VS to
get to the offending line.
#
# To
use one of these compile lines, just comment out the other.
#
$(PROJECT).o:
$(PROJECT).c
#
$(CC) $(INCLUDES) $(CFLAGS) -c $<
$(CC) $(INCLUDES) $(CFLAGS) -c $(abspath $<) 2>&1 | sed
-e "s/\(\w\+\):\([0-9]\+\):/\1(\2):/"
##Link
$(TARGET):
$(OBJECTS)
$(CC) $(LDFLAGS) $(OBJECTS) $(LINKONLYOBJECTS) $(LIBDIRS) $(LIBS)
-o $(TARGET)
%.hex:
$(TARGET)
avr-objcopy -O ihex $(HEX_FLASH_FLAGS) $< $@
%.eep:
$(TARGET)
avr-objcopy $(HEX_EEPROM_FLAGS) -O ihex $< $@ || exit 0
%.lss:
$(TARGET)
avr-objdump -h -S $< > $@
size:
${TARGET}
@echo
@avr-size -C --mcu=${MCU} ${TARGET}
## Clean
target
.PHONY: clean
clean:
-rm -rf $(OBJECTS) $(TARGET) dep/* $(PROJECT).hex $(PROJECT).eep
$(PROJECT).lss $(PROJECT).map
## Other
dependencies
-include
$(shell mkdir dep 2>NUL) $(wildcard dep/*)
But the part of this makefile that lets you double-click an error
message happens in the ## Compile section; I've copied the relevant
line below:
$(CC) $(INCLUDES) $(CFLAGS) -c $(abspath $<) 2>&1 | sed
-e "s/\(\w\+\):\([0-9]\+\):/\1(\2):/"
This line contains several tweaks versus the normal compiler
invocation. The phrase "$(abspath $<)"
converts the relative path of a source file into its full absolute
path, so firelampvs.c becomes c:\projects\firelampvs\firelampvs.c.
The phrase "2>$1"
collects both the normal output and error output streams into a single
stream, which embeds any error messages from the compiler into the
standard output stream.
Finally, the phrase "| sed -e
"s/\(\w\+\):\([0-9]\+\):/\1(\2):/"" routes this combined
output stream to an invocation of sed, the Linux stream editor.
sed in turn converts the error text from the format used by GCC to the
format needed by Visual Studio.
This last step assumes you have a copy of sed installed on your dev
machine. You can find Windows versions of sed on the web;
download and install as appropriate.
NOTE: Some versions of sed exist for use in a Cygwin environment.
Be sure you use a sed that matches your environment. For example,
I am working in a stock Windows (non-Cygwin) environment, so I used a
straight Windows sed.
Please note that there are several variations of the above sed phrase
on the Web. I went through about a half dozen before finding a
phrase that worked the way I wanted it (and I still had to tweak it
slightly). Some phrases I found assume you are working in a
Cygwin environment and the phrase references your Cygwin base
drive. The above phrase works for me, but your mileage may vary
based on your environment.
With the above addition to your makefile in place, you can now
double-click on an error message from your build output and VS 2005
will automatically jump to the source line containing the error.
For large projects, such as my Basic compilers, this is a huge time
savings, as I no longer have to dig through the various folders and try
to find the offending line by number.
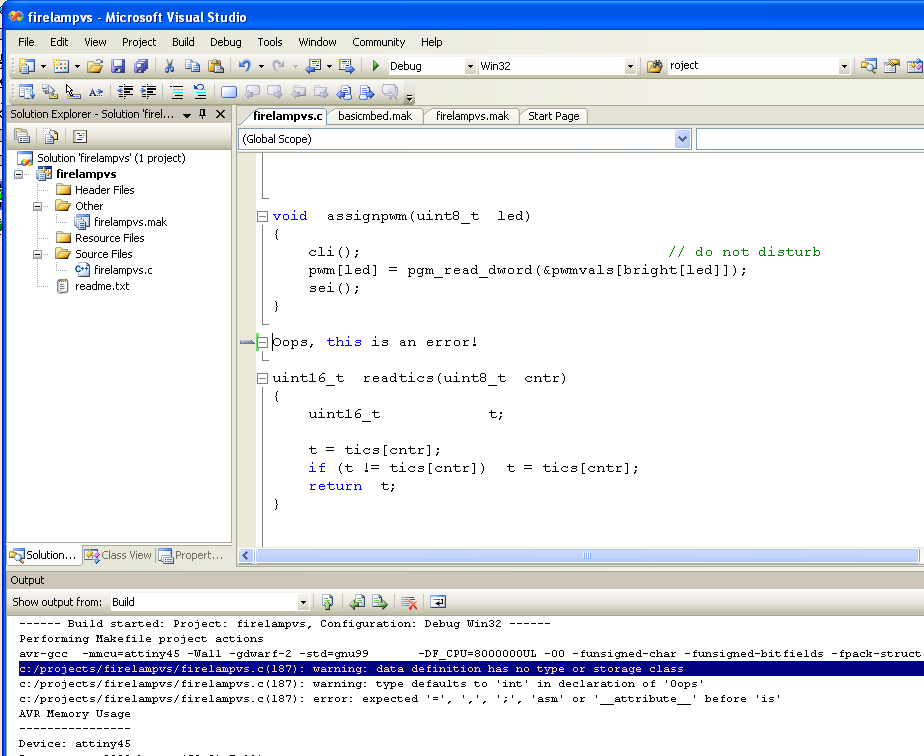
As a quick demo of this feature, I added an error in my firelampvs.c
file, rebuilt, then double-clicked the error text. You can see
here how VS 2005 selected the offending line for me. (The screen
capture removed the highlighting; it's the line next to the vertical
cursor.)
Summary
This mod isn't for everyone. If you're comfortable with
the features of AVR Studio4 and don't want to get involved with
makefiles, you might want to skip this. But those dissatisfied
with some parts of AVR Studio4 and willing to take on makefiles (or
already experienced with them) may want to check out this mod.
Home


