The mature specimens are good for spore production, but are not as good for consumption (weaker potency). They are characterized as becoming darker, with dark bluish colors appearing on the caps and stems. The cap upturns and reveals gills darkening a deep brown color. The mushroom will look like an umbrella that has turned up edges. On the stem can be seen the purple deposits of the dropping spores. Mature adult mushrooms release spores by the millions. In the area around the mushrooms can be seen a deepening color of purple. As the spores fall and collect they will color deep purple. This is the signal that the mushroom has matured and is now in its sporulation cycle. This is the time to take their spores.
KERR 1/2 PINT WIDE MOUTH (LOW FORM) CANNING JAR. (ANY SUITABLE JAR IS OK)
FINGER NAIL CUTICLE SCISSORS - (cosmetics - drug stores)
ALCOHOL, TEQUILA SHOT GLASS AND EYE DROPPER.
1. Pre sterilize the jar and regular metal lid (rubber edge up) in a small toaster oven at around 300 degrees Fahrenheit for around a half hour. Keep the lid loose during the sterilization cycle. When the jar has cooled down, tighten the lid until it is time to use the jar for a spore print. The rubberized edge will be a bit melted, but that won't be any problem in this technique.
Note: What follows is a sterile technique. The first rule that must be always followed is to wash hands prior to sterile work. Hands are a prime source for bacteria and micro spore contaminants. Sterilize all the work surfaces with rubbing alcohol. Minimize drafts. Try for a still air environment. Don't breathe on the work. Run a small home appliance style HEPA air cleaner (99.97% rated efficiency - available at drug and department stores) for a few hours in a closed room to clean the air before doing sterile work.
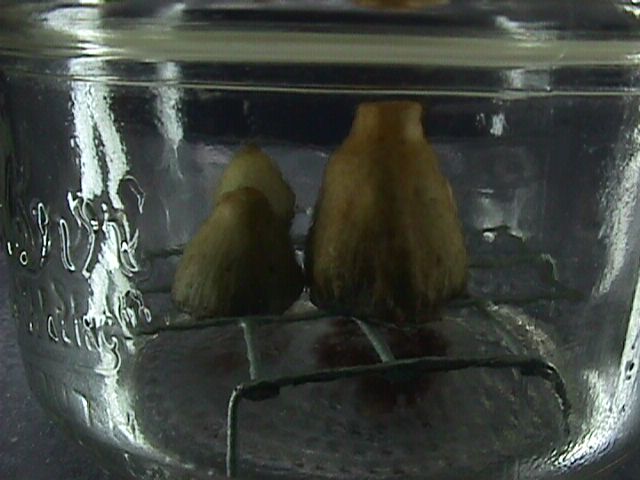
2. Flame sterilize the scissors with an alcohol flame and snip off the mushroom cap. Cut the top of the stem as far up into the cap as possible so that the gills of the mushroom will sit flat on the surface of the jar bottom. With quick and sure movements, place the cap into the jar and place the lid on loosely. Pierce the top of the cap with a straight pin to pick it up and handle it.
3. Leave the jar with a loose cap for a couple of days in a draft free area away from direct sunlight. After the print is taken, quickly and with as little air disturbance as possible, remove the jar cap and extract the mushroom cap from the jar. With a loose jar cap, let the jar sit in a draft free place to dehumidify for a few days before sealing it up (with tape) because there will be some residual moisture left behind on the spores and glass. Store the spore print jar at room temperatures in a dark place away from sunlight. Don't store it in a refrigerator.
Psilocybe Cubensis spores begin to degrade a few months after they are taken. After approximately 1 1/2 years, spore germination will be greatly reduced or won't occur at all. Germination is massive and quick when the spores are fresh.
Materials list:
1. Spore print in jar.
2. Sterile syringe with water for injecting water into the spore print jar.
3. Empty sterile syringe for loading spore solution out of the jar.
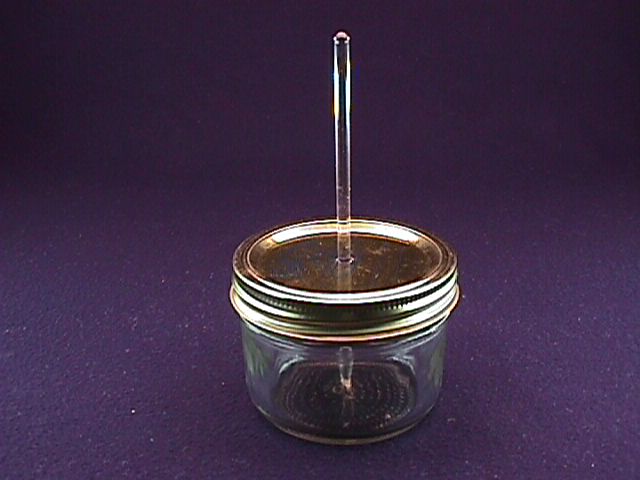
4. A small Pyrex glass stirring rod (science - lab supply).
5. Alcohol, tequila shot glass and eye dropper.
6. Lid with two holes. Prepare this lid by drilling a hole in the center of the lid to fit the Pyrex glass stirring rod. Punch the second hole near the edge of the lid (rubberized
edge up) to fit a syringe needle.
Boil a pot of water. Draw boiling water into a syringe and squirt it out several times. Refill the syringe with boiling water, replace the needle quard and wrap the syringe in tin foil. Prepare several syringes like this. Drop the syringes into the boiling water and boil them for one hour. Let them cool before using. Sterilze empty syringes also.
The main point of this technique would be to expose the interior of the jar to as little room air as possible. Always protect the holes in the lid by placing tin foil or sterile surgical tape over the holes before and after this procedure.
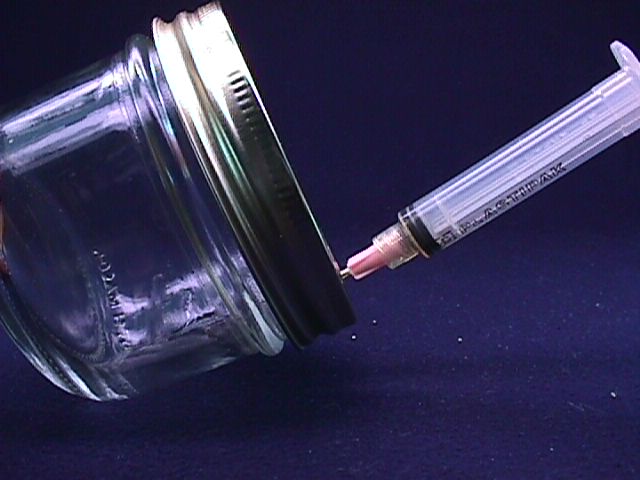
1. Inject sterile water into the spore print jar through the needle hole.
2. Flame sterilize the glass stirring rod and let it cool a minute. Insert it through the center lid hole and with the rod end, scrape spores into the water.
3. Insert the sterile syringe needle through the small hole at the edge of the lid. Tilt the jar until the water comes up to the needle tip and draw the spore water into the sterile syringe.
Store the syringe at cool temperatures in the dark. A properly prepared spore syringe will be good for several months and even up to a year or more.