
Pdx User Guide
Table of Contents
- 1. Preface
- 2. Example
- 3. Markup mechanisms
- 4. Name=Value Pairs
- 5. Characters
- 6. Paragraphs
- 7. Headings
- 8. Verbatim
- 9. Driver-specific
- 10. Include
- 11. Stylesheet control
- 12. Lists
- 13. Tables
- 14. Graphics (or multimedia)
- 15. TeX Math
1. Preface
Rapid yet maintainable project development requires auto-generated documentation for the code, convenient manual preparation for the requirements/specifications/general documentation, and a way to merge the two worlds with quick ad hoc scripts. We need a neutral format that can be readily converted to idiomatic printed documents, web pages, data bases, code chunks, etc. Several approaches have been used in the past including TeX/LaTeX, SGML, HTML, Perl's Pod, Sdf (based on Pod), and XML. These tend to be too verbose in terms of keystrokes, too complex for non-motivated writers, or too wedded to a particular output format. Given current trends, something which converts to XML and from there to other formats is probably the way to go.
With that in mind, we developed the original pdx2hmtl. Why a new markup? It was easier to develop a new one (a 6 hr hack) than to get permission to download and use something else. It was also easier to add features to a program designed for maintainability from the start than to learn and tweak an existing package.
A couple of years and hundreds of web pages later, it was time to rethink the whole scheme. Re-investigating the standard offerings did not provide anything better, so I redeveloped the notion from scratch, as a GPL package.
2. Example
Use hello.pdx as the first example.
- hello.pdx
- The input. Notice that it includes a couple of files,
and has some local configuration statements.
- default_cfg.pdx
- Configuration for all files in this project, this dir, etc.
- styles/article_style.pdx
- Each document file points to this stylesheet. The stylesheet includes the
appropriate driver-specific style, which may be kept in a shared dir,
e.g. styles
- styles/html_article.pdx
- The actual style. As you see, it simply sets up the framework for
a typical webpage. You can override any of the settings in a given pdx file.
- hello.html
- The output. The format, borders, headers, footers, etc. are all defined by
the configurations files and stylesheets. Only the intellectual content is
defined in the initial pdx.
- go
- A simple script to run the translation. Usually have several
pdx's handled in a single go script. For multi-user projects,
may want to enforce permissions:
   pdx2html.py hello.pdx
   pdx2html.py goodbye.pdx

   chmod 660 *.pdx *.html
   chgrp ourgroup *
3. Markup mechanisms
The hello.pdx file demonstrates all the basic markup mechanisms
- Comments start with # and will continue to the end of the line.
The # must be the leftmost non-space char on the line. NOTE: #
lines are left as is in verbatim contexts.
- There is typically a =cfg ... =end cfg section at the
start. In general, functions which apply to entire blocks of input use this
approach, with a closing =end.
Actually, you could put the configuration section anywhere, but the start is conventional. It has a series of name=value pairs. For the default templates, you must provide a title, desc (i.e., description), creator_name, and creator_email.
- Headings, marked with =headn, where n is the heading
level. In general, functions which apply to just one or a few input
items are done on one line, with no closing =end.
- Text, which is just typed as is. Skipped (blank) lines are
treated as paragraph breaks.
- Marked up text, using a code and "<..>", e.g.:
B<this is bold>
This "<..>" approach is used for other in-the-line markups as well. - Generally, the "=..." commands must start at the left margin.
=list and =item can be indented to make nested list structure
clearer.
For the remainder of the tutorial, we will add functionality to hello.pdx. Make the changes in your copy of hello.pdx, and view the results in your browser.
4. Name=Value Pairs
You can define name=value pairs. We already saw that in the cfg section:=cfg title = My Title ... =end cfgName=value pairs can also be done one line at a time:
  =def greeting = hello
  =def greeting=goodbye
In other words, =cfg is just a convenient way to do several =def lines. We could have done:
  =def title=My Title
  =def desc = This is a sample.
  ...
The rules are:
- The name may be made of lowercase letters, digits, or the underscore. In regular expression terms: [a-z0-9_].
- Spaces are optional around the "=".
- The value can be anything (including embedded spaces) up to the end of the line. Trailing spaces are deleted.
Actually, the "=" can be replaced with variations:
| Code | Example | Description |
| == | xyx == foo | use foo as-is |
| +== | xyz +== foo | append foo to existing xyz as-is |
| = | xyx = foo | use foo after processing in-line markups |
| += | xyz += foo | append foo to existing xyz after processing in-line markups |
Name=value pairs can be used several ways. First, they can be used directly in the Pdx code. For example, the "toc_p" (table of contents flag) controls whether or not a table of contents is generated. Some of these are visible as commandline options:
| Name | Default | Command line option | Comment |
| toc_p | 1 | --toc or --notoc | make a table of contents |
| index_p | 0 | --index or --noindex | make an index |
| expand_p | 0 | --expand or --noexpand | expand @...@ values |
| numbered_heads_p | 0 | --numbered_heads | Number headings, e.g. 1.1, 1.1.1, etc. |
Next, the names can be expanded in-line in "@...@":
  =def greeting=hello
  My greeting is: @greeting@, world
The result is: My greeting is: hello, world
Defs can also be made in a cfg section in a driver-specific stylesheet. This allows driver-specific markups:
  (in cfg section in an html style)
  b==<B>
  /b=</B>
  (in cfg section in a latex style)
  b=={\bfseries
  /b==}
  (in common pdx file)
  This is a @b@bold@/b@ statement.
5. Characters
The POD-defined font markups are:This is B<bold>. This is C<code>. This is I<italics>. This is U<underlines>.This is bold . This is code. This is italics . This is underlines .
A better approach is to use defined markers as noted above (e.g., b, /b). See also preamble_append to setup CSS or javascript mechanisms.
There are a few characters that give various drivers fits. These need to be escaped , so they can be recognized and handled. The format is:
E<code>
| Code | Result |
| lt | < |
| gt | > |
| amp | & |
| quot | " |
| lb | # |
6. Paragraphs
6.1. Breaks
A skipped line is considered a paragraph break The default is left justification:
  This is a paragraph.

  And this is another one.
This is a paragraph.
And this is another one.
Horizontal rule is borrowed from HTML:
<HR>This gives a horizontal rule in HTML, a pagebreak in latex, and nothing in docbook:
Break is borrowed from HTML:
This is a <BR>breakThis is a
break
6.2. =center
To center a chunk of input:=center This is will be centered. As will this. =end center But not this.
As will this.
Notice we had to skip a line to get the "As will this" to be treated as a separate indent. We can get that effect by inserting a break:
  =center
  This is will be centered.<BR>As will this.
  =end center
  But not this.
As will this.
6.3. =quote
To make a blockquote:
  =quote
  This is quoted

  And runs onto several lines which may so long that they have to fold.  blah
  blah blah blah blah blah blah blah blah blah blah blah blah blah blah blah
  blah blah blah blah blah
  =end quote
This is quotedAnd runs onto several lines which may so long that they have to fold. blah blah blah blah blah blah blah blah blah blah blah blah blah blah blah blah blah blah blah blah blah
7. Headings
As shown in hello.pdx, headings are given by =headn. n can be 1-5. Next we must decide:- Should there be a table of contents?
- Should the headings be numbered?
Add more headings to hello.pdx, and then try setting these names in the cfg section:
  toc_p = 1
  numbered_heads_p = 1
Try various combinations of 0 and 1 for these names.
8. Verbatim
A verbatim section is printed exactly as typed:
   =verbatim
   This is verbatim
      with
             funny indents
    Notice that B<font markups> do not take effect
   =end verbatim
9. Driver-specific
9.1. =for
  =for html  You can use <FONT COLOR="RED">HTML</FONT> markups.
  =for latex You can use \LaTeX\ markups.
You can use HTML markups.This provides quick, one-line inputs.
9.2. =begin
  =begin html
  You can use <FONT COLOR="RED">HTML</FONT> markups
  which cover multiple lines.
  =end html

  =begin latex
  You can use \LaTeX\ markups
  which cover multiple lines.
  =end latex
You can use HTML markups which cover multiple lines.
10. Include
We want to build our documents in modular pieces and need a way to put the pieces together. This is done with includes.
10.1. =include
In the simple case, we just give the path (absolute or relative from our original pdx file's dir):
=include ../test/testdata/dummy.pdx
This includes the file, and then processes it as if it were a part of the original file.
line 1: This is included from the dummy.pdx file. line 2: An embedded include, to another dir: line 1: This is included from the dummy.pdx file. line 2: An embedded include line 1: This is doc/dummy2.pdx, included from doc/dummy.pdx file. line 2: An embedded include, to another dir:
line 1: This is I<included> from the dummy.pdx file.
line 2: An embedded include, to another dir:
=include ../../doc/dummy.pdx
line 4
line 5
line 6: final line
line 4 line 5 line 6: final line
line 4 line 5 line 6: final line
line 4 line 5 line 6: final line
10.2. =pathpush
What if dummy.pdx called some other file with a relative path? We'd lose track of the current dir. We need to keep track of each file's home dir, and then forget those paths as we finish with the files. This can be implemented with a stack.
If you use a non-local path in an include, pdx automatically pushes the path:
=include ../test/testdata/dummy.pdxline 1: This is included from the dummy.pdx file. line 2: An embedded include, to another dir: line 1: This is included from the dummy.pdx file. line 2: An embedded include line 1: This is doc/dummy2.pdx, included from doc/dummy.pdx file. line 2: An embedded include, to another dir:
line 1: This is I<included> from the dummy.pdx file.
line 2: An embedded include, to another dir:
=include ../../doc/dummy.pdx
line 4
line 5
line 6: final line
line 4 line 5 line 6: final line
line 4 line 5 line 6: final line
line 4 line 5 line 6: final line
Alternatively, if you need to point to a dir and then use local paths, you can manually push and pop.
  =pathpush ../test/testdata
  =include dummy.pdx
  =pathpop
line 1: This is included from the dummy.pdx file. line 2: An embedded include, to another dir: line 1: This is included from the dummy.pdx file. line 2: An embedded include line 1: This is doc/dummy2.pdx, included from doc/dummy.pdx file. line 2: An embedded include, to another dir:
line 1: This is I<included> from the dummy.pdx file.
line 2: An embedded include, to another dir:
=include ../../doc/dummy.pdx
line 4
line 5
line 6: final line
line 4 line 5 line 6: final line
line 4 line 5 line 6: final line
line 4 line 5 line 6: final line
Since the rest of our examples in this section are from the test dir, we'll push that path and pop it when we are done.
=pathpush ../test/testdata
10.3. =include_for
Suppose you want to include a pdx file and then process it, but only if you are running that particular output driver. The drivers are the same name as the module (e.g., Html.pm), but in lowercase.
  =include_for html  dummy_html.pdx
  =include_for latex dummy_latex.pdx
This is a block of pdx to be included only in html files. Thus it could be used for autogenerated chunks of html, generated elsewhere and placed here in a begin block. E.g.,:
10.4. =include_raw
Next, suppose you want to include raw files for a given driver. E.g., a chunk of HTML has been generated by some other tool.
  =include_raw html dummy_raw_html.html
  =include_raw latex dummy_raw_html.latex
This is raw HTML
10.5. =include_verbatim
Finally, suppose you want the file exactly as is, with not even the driver's standard treatment. E.g., a chunk of code.
=include_verbatim dummy.pdx
line 1: This is I<included> from the dummy.pdx file.
line 2: An embedded include, to another dir:
=include ../../doc/dummy.pdx
line 4
line 5
line 6: final line
10.6. =pathpop
We are done with including from the test dir, so pop the path stack.
=pathpop
To set up a style sheet, you typically need to generate a prefix,
append a few things of your own to the prefix, do the body, and then
do a postamble. These are supported with:
Each of these is a block, requiring an =end statement. See
html_article.pdx for a typical
case. See the styles dir in this distribution for more.
NOTE: You do not have to indent -- you could choose to leave
everything at the left margin. But some people find it easier to edit
if indents are allowed.
Another form of list is numeric, fully numbered:
Tables can be complex structures. Pdx makes no effort to capture all
the nuances. Instead it offers simple ways to do simple tables. If
you need more complexity, build it in your chosen output language and
do an =include_raw.
First, you can just assume a grid (with or without caption),
and let the system do the column widths:
11. Stylesheet control
12. Lists
We need to support nested lists. They should allow various numbered and
unnumbered formats. Further, it is often helpful to
actually indent to show nesting in the raw input.
  =list []
  =item Unordered
  Begin with C<=list *>
        =list *
        =item item 1
        =item item 2
        =end list
  =item Numbered
  Begin with C<=list 1>
        =list 1
        =item item 1
        =item item 2
        =end list
  =item Alphabetic
  Begin with C<=list A>
        =list A
        =item item 1
        =item item 2
        =end list
  Begin with C<=list a>
        =list a
        =item item 1
        =item item 2
        =end list
  =item Descriptive
  Begin with C<=list []>
        =list []
        =item item 1
        Is the first item
        =item item 2
        Is the second item
        =end list
  =item Altogether:
  Descriptions, with
        =list *
        =item Bullets, with
        =list 1
        =item Numbers, with
            =list A
            =item Upper-case alphas, with
                =list a
                =item Lower-case aplhas
                =end
            =end
        =end
    =end
  =end list
Begin with =list a
  =list N
  	=item item 1
          =list N
          =item item 1.1
          =item item 1.2
              =list N
              =item item 1.2.1
              	=list N
              	=item item 1.2.1.1
              	=item item 1.2.1.2
  		    	=end list
              =item item 1.2.2
  		    =end list
  		=end list
      =item item 2
  =end list
13. Tables
  =table
  =row This is row 1, col 1    & This is row 1, col two
  =row This is row 2, col 1    & This is row 2, col two
  =row This is row 3, col 1    & This is row 3, col two
  =end table
| This is row 1, col 1 | This is row 1, col two |
| This is row 2, col 1 | This is row 2, col two |
| This is row 3, col 1 | This is row 3, col two |
  =table Table with a caption
  =row This is row 1, col 1    & This is row 1, col two
  =row This is row 2, col 1    & This is row 2, col two
  =row This is row 3, col 1    & This is row 3, col two
  =end table
| This is row 1, col 1 | This is row 1, col two |
| This is row 2, col 1 | This is row 2, col two |
| This is row 3, col 1 | This is row 3, col two |
Alternatively, you can control the column size (by percent), the grid, and the caption:
  =table [25,75];grid; Table with grid
  =row This is row 1, col 1    & This is row 1, col two
  =row This is row 2, col 1    & This is row 2, col two
  =row This is row 3, col 1    & This is row 3, col two
  =end table
| This is row 1, col 1 | This is row 1, col two |
| This is row 2, col 1 | This is row 2, col two |
| This is row 3, col 1 | This is row 3, col two |
  =table [25,75];nogrid; Table with no grid
  =row This is row 1, col 1    & This is row 1, col two
  =row This is row 2, col 1    & This is row 2, col two
  =row This is row 3, col 1    & This is row 3, col two
  =end table
| This is row 1, col 1 | This is row 1, col two |
| This is row 2, col 1 | This is row 2, col two |
| This is row 3, col 1 | This is row 3, col two |
You can also insert blocks into table cells. Caveats:
- You cannot nest tables
- The first line must not have nested blocks
    =table
    =row B<Feature> & B<Example>
    =row lists
    =cell
    This is a list
    =list *
    =item my item 1
    =item my item 2
    =end list
    =end cell
    =end table
| Feature | Example |
| lists | This is a list
|
14. Graphics (or multimedia)
These tend to be driver-specific, so use =for statements. E.g.:
  =center
  =for html  <IMG SRC="pdxpic.jpg" ALT="Pdx Picture">
  =for latex \includegraphics[width=0.4\textwidth]{pdxpic.eps}
  =end center

15. TeX Math
NOTE: This requires TeX/LaTeX, dvips, pstoimg and netpbm. The output is a .png file. All should be available on a normal Linux installation or any well-appointed *NIX system. See Base.do_texmath_png to setup alternate toolchains.
TeX currently has the best treatment of math equations. It may be tedious to learn, but it is powerful. Pdx provides a texmath block, and that in turn can be used for in-line and separate math displays:
  This is an inline TeX math entry, from here:
  =texmath
  $a=\sqrt{b}$
  =end texmath
  : to here
This is an inline TeX math entry, from here:
 : to here
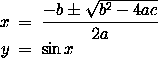
  This is a TeX math entry as a standlone equation array:

  =texmath
  \begin{eqnarray*}
    x & = & \frac{-b \pm \sqrt{b^2 -4ac}}{2a} \\
    y & = & \sin{x}
  \end{eqnarray*}
  =end texmath
This is a TeX math entry as a standlone equation array:
Creator: Harry George
Updated/Created: 2002-06-24